
I have officially completed my first DIY project for Home with Emily Jean! Woohoo!
I’ve never been a huge fan of ottomans… Yes, ottomans may be convenient when you want to prop your feet up while watching TV, but I love having a solid, stable surface to put things on while adding some color and texture to the living room. Well… when we were shopping for our new sectional, Vince convinced me to get the matching ottoman (It’s HUGE, by the way … It’s 51″ x 51″!). I don’t regret it at all… I love that the ottoman can be pushed up against the couch to make a giant bed-like seating area for movie nights, but I’ve found myself struggling to find a place to put my glass of water or my cup of tea recently… and I ALWAYS have some type of drink with me.
So… I decided to build a coffee table to place over our ottoman to have both a comfortable and functional centerpiece for our living room.
We got a 4′ x 8′ piece of red oak plywood from Home Depot (I would have preferred white oak, but there weren’t any in stock) and asked them to cut the plywood into two 2′ x 8′ pieces. Fitting them into my mini SUV was quite the adventure… Note to self: borrow a truck for future projects that require larger pieces of plywood.

I started by laying the plywood out over our ottoman and taking some measurements. A 2′ x 8′ piece was the perfect size to make my 54″ long coffee table with 21″ tall legs.
Next, I used my miter saw to cut the plywood into three pieces. The associate at Home Depot warned us that oak splinters easily and recommended that we purchase a saw blade with shallow and more numerous teeth to make finer cuts, but we didn’t want to spend too much money and decided to take the risk. He was totally right… It definitely splintered on the side where the blade met the wood, but I was able to fill the little cracks with wood filler later on. If you’re cutting oak with a miter saw, I recommend placing the wood on the miter saw surface with the top facing down to avoid splintering the wood on the side you plan on exposing.


I joined the pieces with liquid nails and corner clamps, and once that was dry, I reinforced it with wood screws from the top. If I were to do this project again, I would learn how to use pocket holes so the screws are hidden.

I filled the holes and covered the screws with wood filler, sanded down the entire table, and wiped off the saw dust with tack cloth to prepare it for wood stain.


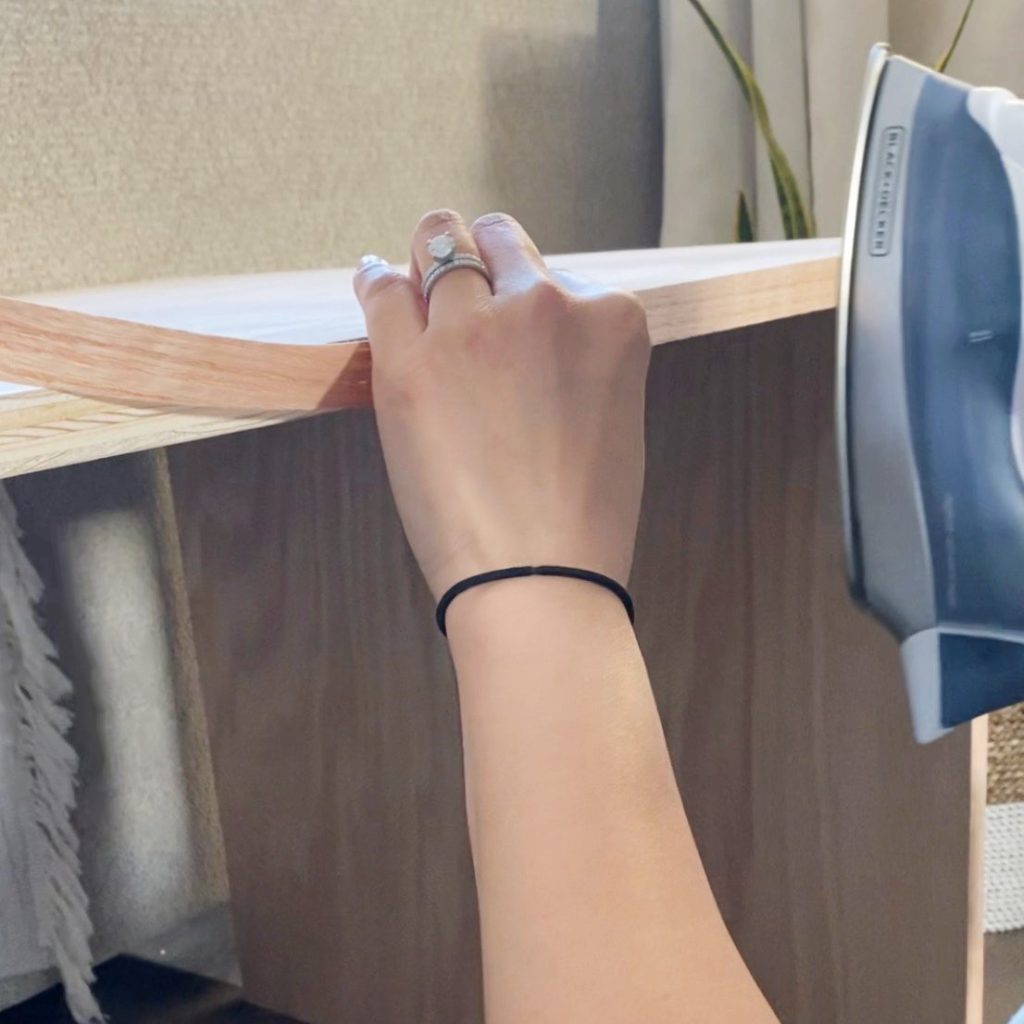
Next, I ironed some red oak edge banding over all edges to cover up the layers of plywood. This was definitely the most tedious step of the whole project, but it really did make the table look more finished and was worth the time.

Lastly, I applied my wood conditioner and then my stain (Varathane Expresso) after testing over 10 stains to find the perfect tone…

and VOILA!!! Now I have somewhere to put my drinks throughout the day and am still able to use the ottoman when needed!
If you’d like a water-resistant surface for extra protection, you can add a layer of polyurethane once the stain has dried. I decided to skip this step for now, mainly because I was too excited to see the finished product and start using the table, but I definitely plan on doing this in the near future.


What I learned…
- Oak is SO BEAUTIFUL. I love the wood grain and the sturdiness of the wood. It’s also much easier to stain than pine!
- Oak splinters when cut. Research the type of blade recommended for cutting oak prior to cutting. To minimize splintering, place the wood top side down on your miter saw.
- Always apply wood conditioner before staining for an even coat.
- Glue does not stain… Thankfully, there’s only one spot that was affected by the liquid nails.
- Edge banding is actually pretty cool! It has a heat-activated adhesive on the back and is really easy to apply with an iron.
- The wood filler did not stain as well as the real wood did. If you look closely at the table, you can see where I screwed the pieces together. Pocket holes would have been best for this project.
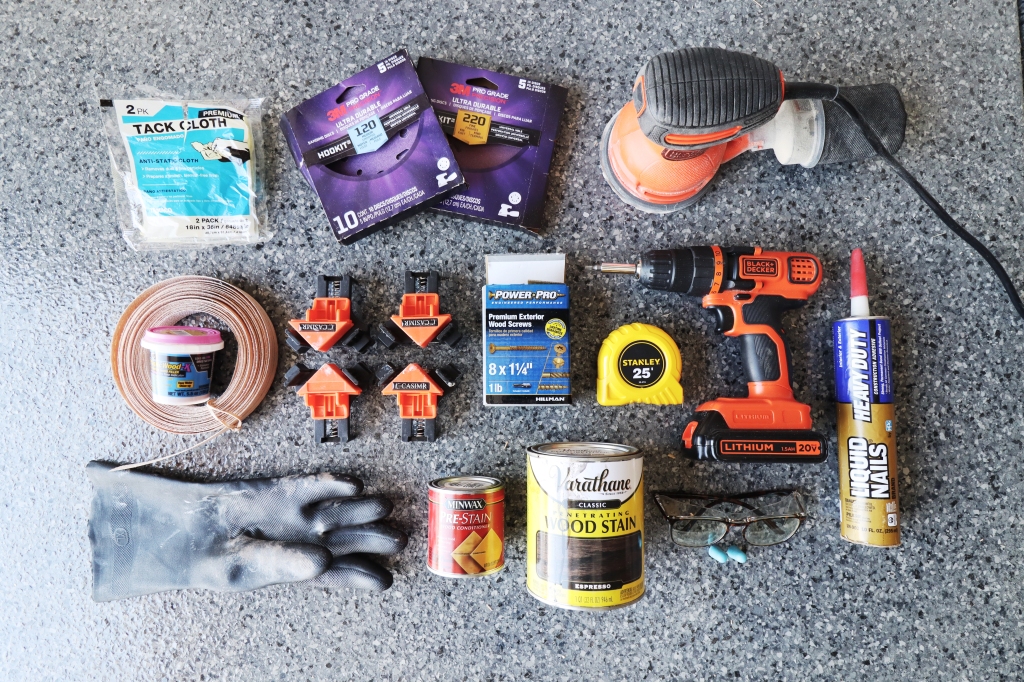
For this project, I used…
- Plywood
- Tape measure
- Safety goggles and ear plugs
- Miter saw
- Liquid nails
- Corner clamps
- Power drill and wood screws
- Wood filler
- Orbital sander and sanding discs
- Edge banding that matches the wood
- Wood conditioner, wood stain, gloves, and a rag
Now you’ll find me sitting on the couch with my legs propped up on the ottoman and my tea sitting on the coffee table for the rest of the day.

Until next time,
Emily

Love the post!!! Will definitely be following!
LikeLike
OMG EMILY THIS LOOKS SOOO GOOD! I love it!! can’t wait to see more updates!!
LikeLike
That’s a beautiful piece! Good work, Emily!
LikeLike
Wish I would have seen this last week when I decided not to get the matching ottoman with our new sectional, lol. This is GORG!
LikeLike
How fantastic! I’ve recently discovered this “wood overlay” design when researching new ottomans and I LOVE that you’ve been able to replicate the design process, on-the-cheap, compared to retailers I’ve found (super expensive).
That said and because my husband and I are NOT strangers to DIY projects, we’re heading to Home Depot, today, to start our ottoman, table-top design!
Thank you for the wonderful step-by-step instructions and the list.
Following you from our home account on IG at:
@PlacePapillion
LikeLiked by 1 person
How exciting!! I wish you the best of luck with this project! Also… I’ve seen some people secure the top of the table to the legs with nails (using a brad nailer and of course, wood glue) from the top and L brackets on the bottom. This way, you avoid having screws or wood filler show from the table top 😊
LikeLike
This is great. I think putting wheels on the bottom of the table would be good so you can move it back and forth depending on whether you are using the table or the ottoman.
LikeLike
I ended up doing that! You can check out my Instagram for my updated version of this table. I’ll be writing a blog post about it soon.
LikeLike
Could you tell me the name of the sectional and where you got it? I’ve been on the hunt for months and I love this coffee table idea!
LikeLike
The sectional is from the Enola collection at Ashley Furniture store. The options online are limited, but if you purchase it in stores, you can chose the exact pieces you’d like to create the perfect configuration for your home! We love it!
LikeLike
What kind of wheels or casters did you use on the bottom? Could you provide a link if possible??
LikeLike
I’m so glad you were able to see my updated version of this coffee table on Instagram (I’m guessing that’s where you saw that I added wheels). Here is the link to the ones I used:
LikeLike
Hi! Where did you get your rug!?
LikeLike
This is the Off White Moroccan Diamond Pinstripes Tassel Area Rug from Rugs USA. We love it!
https://www.rugsusa.com/rugsusa/rugs/rugs-usa-moroccan-diamond-pinstripes-tassel/Off-White/200GCDI09A-92012.html
LikeLike